Getting Started on Google Classroom™
Now that you have decided HOW to set up your classes on Classroom™, it's time to start creating them. I will take you through the steps, explaining each one. You can also view the video screen recordings I've embedded to follow along.
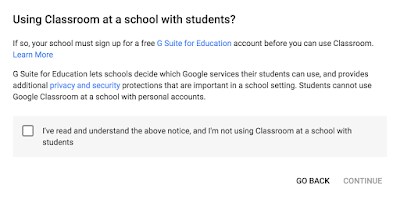
PLEASE NOTE: Using Classroom™does require that your school has a free G Suite for Education account. If you are using it with a personal account, this window will appear:
In order for your documents and students' work to be private and secure, your school should set up a G suite account.
CREATING A NEW CLASS
After you have opened Classroom™, you will arrive on the Home screen. To add a class, click on the plus (+) sign in the top right of the screen.
A pop-up window will appear, which looks like this:
You will fill out the name of the class (i.e. English II, Algebra I, Government, etc.). You can leave the other lines blank or fill them in. If you are setting up multiple sections for the same class, you can label the sections:
When you click "Create," your class is created and will look similar to this:
CUSTOMIZING THE LOOK OF YOUR CLASS
To change the look of the class, use the "Select theme" or "Upload photo" options on the right side of the screen.
When you select the theme, you are given options in a "Gallery." You can also select "Patterns" for additional selections.
If you choose to upload a photo, make sure the dimensions are 2000 x 400 pixels (or 20.833 x 4.1667 inches).
Watch a video recap of these directions here:
ADD CLASSROOM MATERIALS
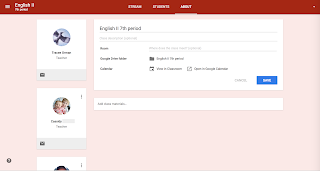
TIP: After you make your class look the way you want, click on the "About" section to add another teacher, attach classroom materials (i.e. if you have an online textbook or other digital materials that are essential for the class, THIS is where you can attach them), view your Classroom Drive folder, and/or Classroom calendar. See in the video below:
Your students will be able to access these materials anytime they need them without having to search the class stream.
ADDING ANOTHER TEACHER
If you co-teach a class, have a teacher's aide, or want to give another teacher (i.e. a special education teacher) access to your class, you can also do this in the "About" section. Just click on the "Invite Teacher" button and enter the email. The teacher will be able to do everything you can do except delete the class.
 |
| You can add details about the class in the "About" section. |
TIP: If you just want to give an aide or another teacher access to the assignments and class materials, it may be better to add them as a student. Most of my aides just wanted a copy of the online assignments so they could type in notes or answers for themselves. When they had access as a teacher, their notes would appear on every student copy because co-teachers do not get their own copy of the assignment like students do; they have access to YOUR original document. At the time of this blog post, Google Classroom™ does not allow you to set parameters for other teachers. If you still wish to give another teacher or aide full access, let them know ahead of time that if they plan to type on any documents you share, they MUST make a copy of the file first or it will mess up your template for the students.
ADDING STUDENTS
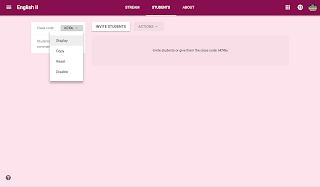
You can add students to your class manually by typing in their email addresses. But that can be very time-consuming. Every class has a unique class code. It's much easier to share your class code with your students and have them add themselves. They will click on "Join class" on their home page, then enter the code you share with them.
You have the ability to display your class code from your screen (using a projector or smart board) to share it with students:
This is also where you can set parameters for your students. Do you want them to be able to create posts? Comment on posts? Or neither? I have found that for some classes, I welcome the feedback and interaction of the students and for others, I had to disable all comment privileges because they made inappropriate remarks. You will need to decide what is best for your classes.
Here's a recap video for adding other teachers and students to your class:
In the next post, I will show you how to add an announcement, assignment, poll your students, start a class discussion, and reuse a post from an archived or another class.
Here are ALL of my Google Classroom™ posts:
Tips for secondary teachers on how you should set up your classes (pros and cons of having one Classroom per subject or one Classroom per class period).
Includes tips and tutorials for creating new classes; customizing the look of your classes; adding new materials/online text; adding students; and adding co-teachers, teacher aides, or access for special education teachers.
Includes tips and tutorials for creating assignments, announcements, and topics. Also has tips on how to save and delay posting and collecting work for students.
Includes tips and tutorials for creating questions, the types of questions available (multiple choice & short answer), allowing students to interact and respond to one another, and how to easily reuse posts from class to class and year to year.
Google Classroom™ is a trademark of Google Inc. Use of this trademark is subject to Google Brand Permissions.


