I started creating these little "props" to use in my own lessons almost a year ago. As you probably know, I am pretty slow to post new products because it does take me a while to complete them. So it was such a relief to finally finish this package of
school-related graphics yesterday. It includes over 95 PNG files that can be used commercially and/or for educational and personal use. My only requirement is a link back to
my website or
my teacher store.
One of the great things about these school supplies is that they can be layered with your favorite characters, as demonstrated below...
...or used on their own.
SIDE NOTE: I have had many questions about "layering" and the difference between JPG (or jpeg) files and PNG files. If you scroll down to the bottom, I included a very brief explanation. :)
My
school supplies bundle contains many images in full color as well as line-art, so you can have students color the graphics (plus it saves on ink). Below, I combined the iPad-like tablet with my
Handwriting Lines clip art, which comes in a variety of lengths and widths and is so easy to work with when creating products for primary students.
I decided to create my
people figures separate from the supplies because I think it adds versatility for the user of the graphics. Have you ever wanted to use an image of a group of items, but one item just didn't fit with what you were making? Now you can make your own groupings, like I did with these
sports balls and equipment. (Plus, some teachers may not want the cute little people. But the "props" are still "cool" enough to use with older students.)
Another advantage is with the overall design of your product or scrapbook page. Sometimes you have to tweak items to make them work. Above, I was able to position the golf club and golf ball to suit my needs. Below, the book and ruler in the image were both rotated to fit in the girl's hands perfectly.
PNG vs. JPG files...
In case I have completely confused you with all this talk about "layering" images, it helps to know a little about the types of images if you plan to design things digitally. So here's a very condensed explanation to the difference between PNG files and JPG files:
The PNG format makes it possible to knock-out the background, so your
images easily layer on top of one another without the white (or whatever
color) background overlapping. You cannot layer JPG (or jpeg) files
like this.
To
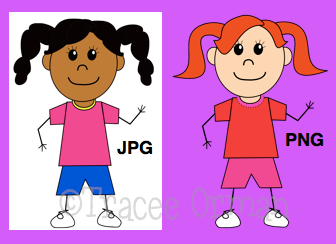
demonstrate, see the image below. The girl on the left is a
JPG file and the girl on the right in a PNG file. When each is placed
on a purplish background, the JPG file will maintain its white
background. The PNG's is knocked-out, allowing you to place additional
PNG files on top of it.

Another difference between the two is PNG files never lose their quality. JPGs, however, will begin to
degrade every time you open them, so over time the quality of the image will not be as sharp. Because of this, PNG files are much larger than JPGs, making JPGs (and GIFs) more ideal for web browsing because they load faster. This was something I learned while
teaching journalism and advising yearbook and newspaper (because digital
photography was not around when I was in college...yes, I'm that old). I picked up a lot during those years, and continue to learn as technology keeps advancing. That's an advantage to teaching: it forces us to keep learning and passing along that knowledge. Of course, I learn just as much from my students as they learn from me.
If you need help working with images in Microsoft Word (which,
in my opinion, is one of the worst programs for design/working with
images), you can download this
free tutorial.
People who use Microsoft and do a lot of designing would probably be
better off using Powerpoint or Publisher.
Back to the clip art...
All of my images are PNG files. On occasion I
will include additional JPG files, but I will
always include the PNG files. You can find all of my packages in the clip art department of my
teacher store.
Or just click on my button below.
Or if you are looking for specific packages, here are some links to my recent ones:
I appreciate you stopping by my blog! This post was long overdue, so I apologize for its length. As thanks for reading through it, you can click
{HERE} to get some limited-time freebies from some of my new packages. Hurry, though. They will only be available for a limited time. Please read the terms of use if using these for commercial products. Also, they cannot be resold in a clip art package, or altered and resold as clip art. If used in a free product, it must be secured in a PDF document. No exceptions. Thank you!


